SBOM은 소프트웨어에 제품에 포함된 오픈소스 라이브러리, 모듈, 종속성 등의 이름, 버전, 공급자, 라이선스, 해시값 정보를 나열한 문서로 최근 한국인터넷진흥원에서 제시한 가이드라인.

즉 사용하고있는 종속성들을 나열하고 해당 종속성들의 취약점을 파악하여 보안을 강화하기 위함.

SBOM 추출

build.gradle plugin에 cyclonedx 플러그인 추가
gradle의 버전에 따라 사용가능한 cyclonedx 버전이 다를 수 있으므로 확인 필요

plugins {
   ...
    id "org.cyclonedx.bom" version "1.7.4"
}


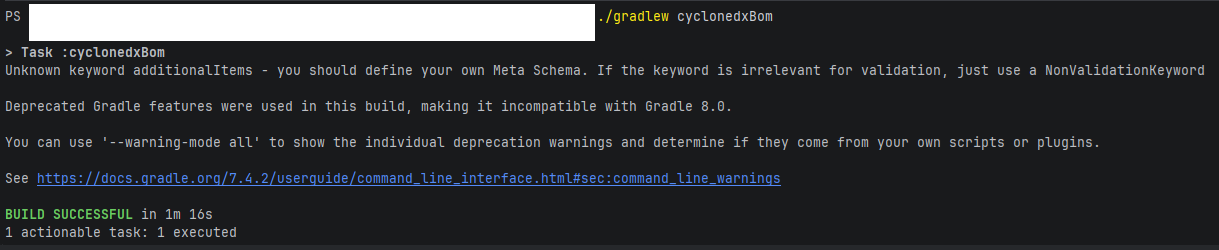
gradle로 cyclonedx를 실행
./gradlew cyclonedxBom


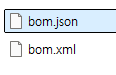
{프로젝트경로}/build/reports/bom.xml 및 bom.json 확인


취약점 항목확인


grype와 sbom파일을 사용하여 취약점 라이브러리를 확인한다.


grype를 설치 하여야 하나 docker로 대체한다.

cd {bom.json 경로}

docker run --rm -v %cd%:/work anchore/grype sbom:/work/bom.json

https://oss.anchore.com/docs/guides/vulnerability/interpreting-results/?utm_source=chatgpt.com

NAME: 취약점이 발견된 의존성

INSTALLED: 사용중인 버전

FIXED IN: 권고하는 버전

TYPE: 라이브러리 카테고리(java-archive, npm, pypi 등)

VULNERABILITY: 취약점 키

SEVERITY: 심각도

EPSS: 앞으로 공격에 사용될 확률 ( FIRST.org 기준 / 사고대응 및 보안 포럼)

RISK: CVSS + EPSS + KEV + 패키지 중요도의 종합점수

(KEY): Cybersecurity and Infrastructure Security Agency 에서 관리하는 Known Exploited Vulnerabilities Catalog에 포함된 취약점으로 실제로 공격에 사용된 취약점을 의미 


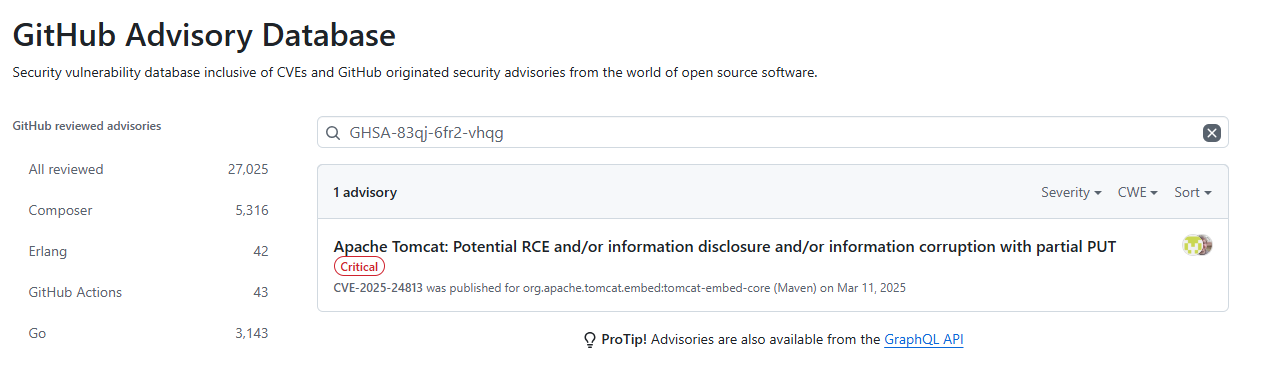
GHSA 취약점은 https://github.com/advisories에서 검색이 가능하다.


회사 인증서 다운


$ npm config set cafile {인증서 파일} --global

혹은

$ set NODE_EXTRA_CA_CERTS={인증서 파일}

프로젝트를 진행하며 발견된 도커의 보안 취약점 정리


inter-container communication(icc)

icc는 네트워크의 옵션으로 네트워크의 컨테이너간 통신을 사용/미사용 처리하는 옵션
컨테이너간 불필요한 통신을 제한하도록 권고 (필요 사유 기입시 허용)

icc: true = 컨테이간 통신가능
icc: false = 컨테이너간 통신 불가능


디폴트 브릿지 icc 적용전 후 테스트


디폴트 브릿지를 사용한 통신

디폴트 브릿지를 사용시 DNS사용이 불가능하기에 컨테이너 이름이 아닌 컨테이너 IP 사용

# nginx 컨테이너 생성
docker run -d --name test-nginx nginx

# nginx의 컨테이너 아이피 확인
docker inspect test-nginx | grep IPAdd
            "SecondaryIPAddresses": null,
            "IPAddress": "172.17.0.2",
                    "IPAddress": "172.17.0.2",

# nginx 컨테이너로 통신
docker run --rm --name test-curl curlimages/curl curl http://172.17.0.2:80

  % Total    % Received % Xferd  Average Speed   Time    Time     Time  Current
                                 Dload  Upload   Total   Spent    Left  Speed
100   615  100   615    0     0   145k      0 --:--:-- --:--:-- --:--:--  150k
<!DOCTYPE html>
<html>
<head>
<title>Welcome to nginx!</title>
<style>
html { color-scheme: light dark; }
body { width: 35em; margin: 0 auto;
font-family: Tahoma, Verdana, Arial, sans-serif; }
</style>
</head>
<body>
<h1>Welcome to nginx!</h1>
<p>If you see this page, the nginx web server is successfully installed and
working. Further configuration is required.</p>

<p>For online documentation and support please refer to
<a href="http://nginx.org/">nginx.org</a>.<br/>
Commercial support is available at
<a href="http://nginx.com/">nginx.com</a>.</p>

<p><em>Thank you for using nginx.</em></p>
</body>
</html>


디폴트 브릿지의 icc 적용

icc 적용

/etc/docker/daemon.json

{
  ...
  "icc": false
  ...
}


icc 확인

docker network inspect bridge | grep enable_icc
  "com.docker.network.bridge.enable_icc": "false",


icc 적용 후 디폴트 브릿지를 통신 테스트

# 기존 컨테이너 삭제후 재기동
docker stop test-nginx ; docker rm test-nginx
docker run -d --name test-nginx nginx

# 컨테이너 아이피 확인
docker inspect test-nginx | grep IPAdd
  "SecondaryIPAddresses": null,
  "IPAddress": "172.17.0.2",
          "IPAddress": "172.17.0.2",

# 컨테이너간 통신 테스트
docker run --rm --name test-curl curlimages/curl curl http://172.17.0.2:80

  % Total    % Received % Xferd  Average Speed   Time    Time     Time  Current
                                 Dload  Upload   Total   Spent    Left  Speed
  0     0    0     0    0     0      0      0 --:--:--  0:02:13 --:--:--     0
curl: (28) Failed to connect to 172.17.0.2 port 80 after 133158 ms: Could not connect to server


커스텀 네트워크 icc 적용전 후 테스트

icc 적용 전 테스트

# 네트워크 생성
docker network create \
  --opt com.docker.network.bridge.enable_icc=true \
  icc-net

# 네트워크 옵션 확인
docker network inspect icc-net | grep icc
      "Name": "icc-net",
          "com.docker.network.bridge.enable_icc": "true"

# nginx 컨테이너에 네트워크 할당.
docker stop test-nginx ; docker rm test-nginx
docker run -d --name test-nginx --network icc-net nginx

# nginx 와 동일한 네트워크 할당후 컨테이너 명으로 통신
docker run --rm --name ltest-cur --network icc-net curlimages/curl curl http://test-nginx:80

  % Total    % Received % Xferd  Average Speed   Time    Time     Time  Current
                                 Dload  Upload   Total   Spent    Left  Speed
100   615  100   615    0     0   183k      0 --:--:-- --:--:-- --:--:--  300k
<!DOCTYPE html>
<html>
<head>
<title>Welcome to nginx!</title>
<style>
html { color-scheme: light dark; }
body { width: 35em; margin: 0 auto;
font-family: Tahoma, Verdana, Arial, sans-serif; }
</style>
</head>
<body>
<h1>Welcome to nginx!</h1>
<p>If you see this page, the nginx web server is successfully installed and
working. Further configuration is required.</p>

<p>For online documentation and support please refer to
<a href="http://nginx.org/">nginx.org</a>.<br/>
Commercial support is available at
<a href="http://nginx.com/">nginx.com</a>.</p>

<p><em>Thank you for using nginx.</em></p>
</body>


icc 적용 후 테스트

# nginx 컨테이너 삭제
docker stop test-nginx ; docker rm test-nginx

# 네트워크 삭제
docker network rm icc-net

# icc false로 네트워크 재생성
docker network create \
  --opt com.docker.network.bridge.enable_icc=false \
  icc-net

# 네트워크 옵션 확인
docker network inspect icc-net | grep icc
        "Name": "icc-net",
            "com.docker.network.bridge.enable_icc": "false"

# 네트워크 할당 된 nginx 컨테이너 생성
docker run -d --name test-nginx --network icc-net nginx

# 같은 네트워크에서 통신
docker run --rm --name ltest-cur --network icc-net curlimages/curl curl http://test-nginx:80
  % Total    % Received % Xferd  Average Speed   Time    Time     Time  Current
                                 Dload  Upload   Total   Spent    Left  Speed
  0     0    0     0    0     0      0      0 --:--:--  0:02:12 --:--:--     0
curl: (28) Failed to connect to test-nginx port 80 after 132533 ms: Could not connect to server


docker compose에 적용하는 방법

docker-compose.yml

...
networks:
  icc-net:
    name: icc-net
    driver_opts:
      com.docker.network.bridge.enable_ic: "false"
프로젝트를 진행하며 발견된 도커의 보안 취약점 정리

userland-proxy

Docker에서 컨테이너 포트를 호스트 포트와 연결(-p) 할 때 사용되는 기능 중 하나
이름 그대로 “사용자 영역(userland)”에서 동작하는 프록시(proxy)
즉, 컨테이너의 포트를 호스트가 접근할 수 있도록 Docker 데몬이 사용자 공간에서 TCP 프록시를 띄움으로써 포워딩을 처리

  1. userland-proxy가 활성화된 경우
  • Docker 데몬이 사용자 공간 프로세스로 TCP 프록시를 띄움
  • 호스트 → 프록시 → 컨테이너 포트 순서로 패킷 전달
  • 장점: 운영체제와 상관없이 동일하게 동작
  • 단점: 약간의 오버헤드 발생
  1. userland-proxy 비활성화 (false)
  • iptables를 이용한 커널 레벨 NAT 포워딩으로 처리
  • 성능이 더 좋음
  • 하지만 컨테이너 내부에서 호스트 IP:포트로 접근하는 경우 일부 상황에서 통신이 실패할 수 있음 (특히 사용자 정의 브리지 네트워크)


userland-proxy 적용전 테스트

응답서버

docker run -d --name test-nginx -p 8080:80 nginx

ps -ef| grep proxy
root       24598   23864  0 10:50 pts/2    00:00:00 /usr/bin/docker-proxy -proto tcp -host-ip 0.0.0.0 -host-port 8080 -container-ip 172.17.0.2 -container-port 80 -use-listen-fd
root       24606   23864  0 10:50 pts/2    00:00:00 /usr/bin/docker-proxy -proto tcp -host-ip :: -host-port 8080 -container-ip 172.17.0.2 -container-port 80 -use-listen-fd
k          24651   22449  0 10:50 pts/3    00:00:00 grep --color=auto proxy


요청서버

docker network create curl-net
docker run --rm --name test-curl --network curl-net curlimages/curl curl http://<wsl IP>:8080
  % Total    % Received % Xferd  Average Speed   Time    Time     Time  Current
                                 Dload  Upload   Total   Spent    Left  Speed
100   615  100   615    0     0  77720      0 --:--:-- --:--:-- --:--:-- 87857
<!DOCTYPE html>
<html>
<head>
<title>Welcome to nginx!</title>
...
<p><em>Thank you for using nginx.</em></p>
</body>
</html>


userland-proxy 설정

/etc/docker/daemon.json 수정 후 데몬 리로드 및 도커 재기동

{
  "userland-proxy": false
}


proxy 확인

docker stop test-nginx ; docker rm test-nginx
docker run -d --name test-nginx -p 8080:80 nginx
ps -ef |grep proxy
k          25280   22449  0 10:55 pts/3    00:00:00 grep --color=auto proxy
k:~$


통신 테스트

docker run --rm --name test-curl curlimages/curl curl http://<wsl IP>:8080
  % Total    % Received % Xferd  Average Speed   Time    Time     Time  Current
                                 Dload  Upload   Total   Spent    Left  Speed
100   615  100   615    0     0   443k      0 --:--:-- --:--:-- --:--:--  600k
<!DOCTYPE html>
<html>
<head>
<title>Welcome to nginx!</title>
...
<p><em>Thank you for using nginx.</em></p>
</body>
</html>


주의 사항!

만약 두 컨테이너의 네트워크가 다르다면 host를 통한 통신이 불가능해진다.


사용자 정의 네트워크를 사용한 nignx

docker network create test-nginx
docker stop test-nginx ; docker rm test-nginx
docker run -d --name test-nginx --network nginx-net -p 8080:80 nginx


네트워크를 지정하지 않은 상태로 통신 테스트

docker run --rm --name test-curl curlimages/curl curl http://<wsl IP>:8080
  % Total    % Received % Xferd  Average Speed   Time    Time     Time  Current
                                 Dload  Upload   Total   Spent    Left  Speed
  0     0    0     0    0     0      0      0 --:--:--  0:02:09 --:--:--     0
curl: (28) Failed to connect to 172.27.25.244 port 8080 after 129405 ms: Could not connect to server


네트워크를 지정한 통신테스트

docker run --rm --name test-curl --network nginx-net curlimages/curl curl http://<wsl IP>:8080
  % Total    % Received % Xferd  Average Speed   Time    Time     Time  Current
                                 Dload  Upload   Total   Spent    Left  Speed
100   615  100   615    0     0   317k      0 --:--:-- --:--:-- --:--:--  600k
<!DOCTYPE html>
<html>
<head>
<title>Welcome to nginx!</title>
...
<p><em>Thank you for using nginx.</em></p>
</body>
</html>


문제 발생 이유

  1. 컨테이너에서 호스트IP:8080으로 접근 시, NAT 루프백 경로 필요
  2. 사용자 정의 브리지는 Docker가 NAT 루프백 규칙을 자동으로 생성하지 않음
  3. 결과: 컨테이너 → 호스트 → 컨테이너 경로가 막혀서 접속 실패

이전 프로젝트에서는 WEB과 WAS가 분리된 서버에서 별도의 도커 네트워크를 구성하여 운영되었다.
하지만 이번 프로젝트에서는 WEB과 WAS가 동일 서버에 배치되면서, 기존 설정대로 호스트 IP를 사용하고 보안조치로 userland-proxy를 false로 설정하면 컨테이너 간 통신이 불가능한 문제가 발생했다.
따라서 이를 해결하기 위해서는 WEB과 WAS 컨테이너를 하나의 네트워크 안에 배치해야 한다.

+ Recent posts