LangChain

언어모델을 보다 간편하게 사용할 수 있게해주는 프레임워크.


공식 사이트

https://python.langchain.com/docs/introduction/


Introduction | 🦜️🔗 LangChain

LangChain is a framework for developing applications powered by large language models (LLMs).

python.langchain.com


RAG( Retrieval-Augmented Generation )

한글로 검색 증강 생성으로 RAG를 사용하지 않는 LLM은 오답(할루시네이션)을 만들어낼 확률이 높으며 이를 해결하기위해 RAG를 사용 

RAG는 답변을 생성할 시 답변 생성에 도움이 되는 소스 데이터를 함께 LLM에 전달함으로써 할루시네이션을 줄인다.


RAG의 순서

1. 검색할 데이터를 추출한다.

증강 검색할 데이터를 워드파일로부터 추출한다.


2. 데이터를 파싱한다.

해당 데이터를 chunk 단위로 분할한다. 이는 LLM이 토큰 단위로 데이터를 처리하며 입력가능한 토큰의 개수는 정해져 있고 불필요한 데이터를 너무 많이 넘기게 되면 RAG 성능이 낮아짐


3. 데이터를 임베딩 한다.

데이터를 벡터의 형태로 변환한다. 벡터로 변환하므로서 각 단어들간의 유사도를 유추 할 수 있으므로 입력한 단어와 높은 유사도를 가지는 데이터를 검색한다.


4. DB에 적재한다.


5. 검색 시 유사도가 높은 데이터를 추출한다.

질문을 임베딩 하여 벡터화 하고 해당 벡터와 유사도가 높은 데이터를 찾는다.


6. 해당 데이터와 질문을 프롬프트로 만들어 LLM에 질문한다.

유사도가 높은 데이터를 사용하여 문장 답변을 생성한다.


LangChain 및 필요 라이브러리 설치

%pip install --upgrade pip
%pip install langchain-community docx2txt langchain_text_splitters python-dotenv langchain-openai langchain-chroma


langchain-community: LangChain의 인터페이스

langchain-openai: 인터페이스로 사용할 내부 코어

docx2txt : 워드 추출 라이브러리

langchain-text-splitters: 문장 파서 


openAI, Ollama anthropic 등 다양한 LLM을 사용할수 있다. 


Langchain을 사용하여 문장 생성

from langchain.chat_models import ChatOpenAI

api_key='api 키'
model = 'gpt-4o-mini'

llm = ChatOpenAI(api_key=api_key, model=model)
llm.invoke("안녕 반가워")


Docx2txt를 사용한 워드 파일 데이터 추출

from langchain_community.document_loaders import Docx2txtLoader
loader = Docx2txtLoader('../tax_with_table.docx')
document = loader.load()
document


TextSplitter를 사용한 워드 파일 분할

파일을 분할하는 이유

  • 입력할 수 있는 토큰의 수가 정해져 있기 때문에 무한정 큰 데이터를 입력 할 수 없음
  • 유사도 검색으로 검색 된 결과가 너무 크다면 불필요한 정보까지 함께 입력 되기 때문에 정확성이 낮아 질 수 있음
  • overlap: 이전 문장의 문맥을 이해하기 위해 이전 청크의 일부분을 가져오는 크기
from langchain_text_splitters import RecursiveCharacterTextSplitter
text_splitter = RecursiveCharacterTextSplitter(
    chunk_size=1000
    , chunk_overlap = 100
)
loader.load_and_split(text_splitter=text_splitter)


RecursiveCharacterTextSplitter 외에도 여러 splitter가 존재한다.


임베딩

문자를 vector화 하는 과정

from langchain_community.embeddings import OpenAIEmbeddings
embedding =  OpenAIEmbeddings(model='text-embedding-3-small')
embedding_document = embedding.embed_documents(["안녕하세요", "반가워요"])


데이터 적재

VectorDB는 Chroma, Pinecone등이 존재하며 해당 DB마다 사용하고 있는 검색 알고리즘이 다르다.


이번 테스트에서는 Chroma를 사용한다.

Chroma는 메모리 DB로 간단히 사용할수 있으며 파일로 데이터를 저장할 수 있다.

from langchain_community.embeddings import OpenAIEmbeddings
from dotenv import load_dotenv
from langchain_community.vectorstores import Chroma

#.env 파일에 OPENAI_API_KEY=api key 추가
load_dotenv()
embedding = OpenAIEmbeddings(model="text-embedding-3-small")

store = Chroma.from_documents(collection_name="tax_document", persist_directory="../Chroma", documents=splitted_document, embedding=embedding)
# 파일에서 받아 올 때 
# store = Chroma(collection_name="tax_document", persist_directory="../Chroma", embedding_function=embedding)


VectorStore에 쿼리 전송

query ="연봉 3000만원의 소득세"
# 유사도 높은 3개의 결과 반환
result = store.similarity_search_with_score(query=query, k=3)


Prompt생성

https://smith.langchain.com/hub/


LangSmith


smith.langchain.com

langchaing hub에는 다른 사용자들이 만들어둔 prompt들이 존재한다.

직접 prompt를 만들지 않아도 다양한 prompt를 사용할 수 있다. 다만 API로 pull을 사용할 시 API_KEY를 발급 받아야한다. 간단하게 검색하여 template으로 사용하기로 한다.

from langchain_community.chat_models import ChatOpenAI
from langchain.prompts import PromptTemplate

# API KEY를 받아서 사용할 시 
# from langchain import hub
# prompt = hub.pull("rlm/rag-prompt")

prompt_text =""""
"You are an assistant for question-answering tasks. Use the following pieces of retrieved context to answer the question. If you don't know the answer, just say that you don't know. Use three sentences maximum and keep the answer concise.
Question: {question} 
Context: {context} 
Answer:"""

prompt = PromptTemplate.from_template(prompt_text)


Chain

위의 Prompt, llm, VectorStore를 합친 인터페이스로 Chain이 없다면 로직은 아래와 같아진다.

1. 질문들 받는다 

2. 질문을 retriver(Store)로부터 유사도 높은 Context(문서)를 추출한다.
3. prompt에 context와 질문을 을 매핑한다.

4. llm에 질문한다.


Chain의 생성자로 prompt, llm, VectorStore를 전달하기 때문에 신규 질문이 들어오면 chain.invoke("질문")만 사용하면된다.


Chain은 종류

이번에는 RerivalQA라는 chain을 사용한다.

이 체인은 먼저 관련 문서를 가져오기 위한 검색 단계를 수행한 다음, 해당 문서를 LLM에 전달하여 응답을 생성한다.


그외 키워드 추출 등 다양한 chain들이 존재한다.

https://python.langchain.com/v0.1/docs/modules/chains/


How to migrate from v0.0 chains | 🦜️🔗 LangChain

LangChain has evolved since its initial release, and many of the original "Chain" classes

python.langchain.com


from langchain.chains import RetrievalQA
from langchain_community.chat_models import ChatOpenAI

api_key='api key'
model = 'gpt-4o-mini'

llm = ChatOpenAI(api_key=api_key, model=model)


chain = RetrievalQA.from_chain_type(
    llm, 
    retriever=store.as_retriever(),
    chain_type_kwargs={"prompt": prompt}
)

chain.invoke(query)


import cv2
import pyautogui as p
import numpy as np
import keyboard
import time

# 캡처할 영역 (X, Y, Width, Height)
# capture_region = (608, 56, 1260, 931)  # 원하는 좌표로 변경

def draw_rectangle(page):
  
  top_left = (600, 56)
  bottom_right = (1260, 931)
  p.screenshot(imageFilename="s파이토치와 유니티 ML-Agent로 배우는 강화학습_목차_"+ str(page).zfill(4) + ".png")

            # , region=(top_left[0], top_left[1] bottom_right[0] - top_left[0], bottom_right[1] - top_left[1]))
# 핫키 설정 (s 키를 누르면 캡처 및 사각형 표시)

# 무한 루프 (q 키로 종료)
def goRoutine():
  page = 1
  while True:
      if keyboard.is_pressed("q"):
          # cv2.destroyAllWindows()
          break
      else:
        draw_rectangle(page)
        p.press('right')
        page += 1

# keyboard.add_hotkey("s", goRoutine)
keyboard.add_hotkey("s", draw_rectangle(1))
print("프로그램 실행 중... (s: 화면 표시, q: 종료)")
while True:
  if keyboard.is_pressed("q"):
      # cv2.destroyAllWindows()
      break
  else :
     time.sleep(5)
     a = p.confirm(text='내용입니다', title='제목입니다', buttons=[True, False])
     print(a)
     if a:
      goRoutine()

0. ML-Agents란?

원문


The Unity Machine Learning Agents Toolkit (ML-Agents) is an open-source project that enables games and simulations to serve as environments for training intelligent agents. We provide implementations (based on PyTorch) of state-of-the-art algorithms to enable game developers and hobbyists to easily train intelligent agents for 2D, 3D and VR/AR games. Researchers can also use the provided simple-to-use Python API to train Agents using


지능형 에이전트를 훈련하는 환경, 파이토치 기반이며 간단한 API를 사용하여 에이전트를 훈련시킬 수 있는 툴킷


1. 유니티 설치

유니티 공식 사이트에서 유니티 허브 다운로드 후 유니티 허브를 통해 유니티 설치

만약 install이 진행되지 않는다면 보안 프로그램을 종료 후 설치해 볼 것 

https://unity.com/kr/download


창의적인 프로젝트 시작 및 Unity Hub 다운로드 | Unity

간단한 3단계로 Unity를 다운로드하고 전 세계적으로 가장 큰 인기를 누리는 2D/3D 멀티플랫폼 경험 및 게임 제작용 개발 플랫폼을 사용하세요.

unity.com


2. ML-Agents 다운로드

https://github.com/Unity-Technologies/ml-agents


GitHub - Unity-Technologies/ml-agents: The Unity Machine Learning Agents Toolkit (ML-Agents) is an open-source project that enab

The Unity Machine Learning Agents Toolkit (ML-Agents) is an open-source project that enables games and simulations to serve as environments for training intelligent agents using deep reinforcement ...

github.com


ML-Agents gitHub에서 소스를 다운로드 현재 최신버전인 2.2.를 사용하였다.


다운로드 후 작업할 디렉토리에 압축 해제


3. Anaconda, Python, learn-ml

3-1. Anaconda

다른 프로젝트의 python과 충돌하지 않도록 가상환경을 사용하며, 사용하기 위해 Anaconda를 사용.

공식 사이트에서 아나콘다 설치

https://docs.anaconda.com/anaconda/install/


Installing Anaconda Distribution — Anaconda documentation


docs.anaconda.com


설치 확인


3-2. python 설치

ML-Agents의 Docs > Installation을 확인하면 권장 python 버전을 확인 할수 있다.

권장 버전은 3.10.12로 python을 설치


각각 설치, 가상환경 목록 조회, 가상환경 활성화

conda create -n mlagent-3.10.12 python=3.10.12

conda env list

conda activate mlagent-3.10.12


파이썬에서 학습에 사용할 mlagents 설치, 문서 권장 설치 버전인 1.1.0, 설치후 pip list로 라이브러리 설치 확인


pip install mlagents==1.1.0

pip list


4. Unity에 ML-Agents 플러그인 적용

4-1. ML-Agents의 예제 프로젝트 Import

유니티 허브 > add > add project from disk > {압축해제한 경로}\ml-agents-release_22\ml-agents-release_22\Project


좌측 탐색기에서 Asset > Example > Scene > 3DBall 선택


4-2. ML-Agents 플러그인 적용

unity > 상단의 window 메뉴 > package manager 클릭 > 상단의 + > install package from disk > 압축해제 폴더 이동 >
com.unity.ml-agents, com.unity.ml-agents.extension 파일의 package.json 파일 선택


5. 빌드

File > build profile > scene List에 3DBall 확인 > Build


6. 학습

6-1. mlagent-learn

아나콘다 가상 python에서 설치한 mlagent를 사용하여 학습진행.


--env 옵션은 build한 Unity의 파일, env옵션 없이 진행한다면 Unity의 재생 버튼을 사용하여 학습 가능

mlagents-learn {yaml파일} --env={build한 exe 파일} --run-id={결과 저장할 폴더 이름}

# ml-agents 압축 푼 경로에서 
mlagents-learn config/ppo/3DBall.yaml --env=../../build_project01/3DBall.exe --run-id=test04


6-2. 결과파일

{압축해제 경로}/results/{run-id}

*.onnx 파일이 학습시킨 모델.


6-3. 적용

모델을 아래에 Drag 혹은 복사 붙여넣기.


적용할 Agent 클릭 후 모델에 Drag > 저장 후 재생 


0. 업무 중 불편사항


업무중 여러 설정 정보를 취합 하여 전달하는 API가 존재 한다.

해당 정보들은 RDB에 저장되어 있으며 일반적으로는 1개의 row가 존재하는 마스터 테이블이다.


해당 데이터들은 변경이 필요하지만 자주 변경은 되지않으므로 CRUD를 위하여 WEB과 API가 필요하다.
Ex) A 설정정보를 위해 A테이블에 대한 API CRUD와 WEB 개발 (데이터 1건)

B 설정정보를 위한 B 테이블에 대한 API CRUD와 WEB 개발 (데이터 1건)

C 설정정보를 위한 C 테이블에 대한 API CRUD와 WEB 개발 (데이터 1건)

... 등등등

단 해당 데이터들은 반드시 1건은 아니며 최대 5건 내외 정도 될 듯 하다 (3건 이상은 못 본듯 하지만 설계상 가능)


해당 건들을 조건에 따라 조합하여 1개의 종합 설정정보를 만들어 API로 전달한다.


위 데이터들을 위해 CRUD API와 WEB 개발 하는 것은 불필요해 보이며, 변동이 적고, 조건에 따른 조합이 필요했다.


이를 위해 WorkFlow를 도입하여 테스트 해보고자 했다


1. Node-Red 란 무엇인가.

Node-RED(노드 레드)는 하드웨어 장치들, API, 온라인 서비스를 사물인터넷의 일부로 와이어링(배선화)시키기 위해 본래 IBM이 개발한 시각 프로그래밍을 위한 플로 기반 개발 도구이다.

Node-RED는 브라우저 기반 플로 편집기를 제공하므로 자바스크립트 함수를 개발하는데 사용할 수 있다. 애플리케이션의 요소들은 재사용을 위해 저장하거나 공유할 수 있다. 런타임은 Node.js 위에서 개발되어 있다. Node-RED에서 만든 플로는 JSON을 사용하여 저장된다. 버전 0.14 이후 MQTT 노드들은 적절하게 구성된 TLS 연결을 만들 수 있다.

2016년에 IBM은 Node-RED를 오픈 소스 "JS Foundation" 프로젝트로 기여했다.

출처 위키백과


2. Node-Red 설치

2-1. 도커 설치

  • 추후 docker compose로 구성하여 volume 또한 잡아주어야 관리가 용이하다.
docker run -it -p 1880:1880 -v node_red_data:/data --name mynodered nodered/node-red


2-2. 로컬 설치

  • 주의 Node.js 설치가 필요하다.
npm install -g --unsafe-perm node-red


실행

node-red


접속

브라우저에서 http://localhost:1880


3. Node-Red에서 RestAPI 테스트

왼쪽의 팔레트에서 http in, function, http response를 드래그하여 플로우 화면에 이동 시킨 후 각 컴포넌트들을 연결한다.


http in을 더블클릭하여 수정


function을 클릭하여 수정


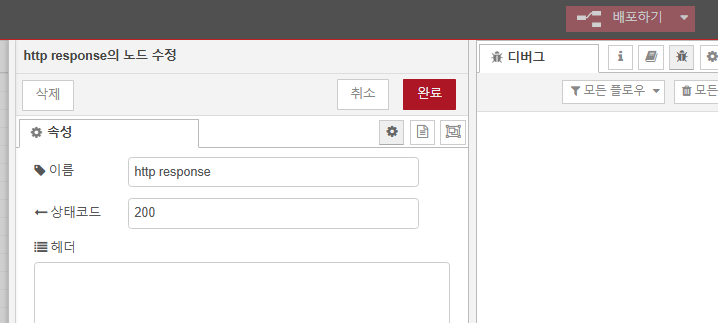
http response 수정 후 오른쪽 상단의 배포하기 클릭


http://localhost:1880/apiTest로 테스트


4. 추가 컴포넌트 설치

시간에 따른 분기처리하는 컴포넌트가 기본으로 제공 되지 않는다.


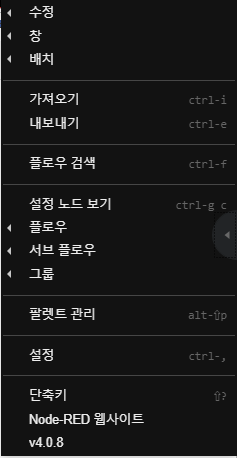
오른쪽의 = 메뉴 > 팔렛트 관리 > 설치 가능한 노드 > node-red-contrib-time-switch 검색 > 설치


기능 노드 > time switch가 생긴 것을 확인 할 수 있다.


5. 샘플 설정 API 구성해보기

5-1. 전체 구성


5-2. 구성 설명

  1. request로 codeValeu를 받는다.
  2. codeValue별 projectId를 다르게 세팅한다.(스위치 노드 사용하여 분기)
  3. target을 설정하는데 나중에 변경 할 수 있도록 A노드를 만들어두고 연결을 끊어둔다.(미사용 처리)
  4. 현재 시간에 따라 ment를 세팅한다. (타임 스위치 노드 사용하여 분기)

5-3. 테스트


6. 내보내기/가져오기


현재플로우/ 전체 플로우를 export, import가 가능하다. 해당 데이터는 json으로 만들어지며 파일/클립보드 형식으로 사용할 수있다.


테스트 샘플 json 공유

[
    {
        "id": "389108cf5e372918",
        "type": "tab",
        "label": "API 테스트",
        "disabled": false,
        "info": "",
        "env": []
    },
    {
        "id": "5c24f9ea6863049d",
        "type": "http in",
        "z": "389108cf5e372918",
        "name": "propertiesSetting",
        "url": "/apiTest",
        "method": "get",
        "upload": false,
        "swaggerDoc": "",
        "x": 200,
        "y": 260,
        "wires": [
            [
                "691f00ddb0f0f4d1"
            ]
        ]
    },
    {
        "id": "691f00ddb0f0f4d1",
        "type": "switch",
        "z": "389108cf5e372918",
        "name": "code 별 분기처리",
        "property": "payload.codeValue",
        "propertyType": "msg",
        "rules": [
            {
                "t": "btwn",
                "v": "10001",
                "vt": "num",
                "v2": "10005",
                "v2t": "num"
            },
            {
                "t": "btwn",
                "v": "10006",
                "vt": "num",
                "v2": "10010",
                "v2t": "num"
            }
        ],
        "checkall": "true",
        "repair": false,
        "outputs": 2,
        "x": 430,
        "y": 260,
        "wires": [
            [
                "dd2e6d4c3f91d1a1"
            ],
            [
                "8d56be140949ad6c"
            ]
        ]
    },
    {
        "id": "dd2e6d4c3f91d1a1",
        "type": "function",
        "z": "389108cf5e372918",
        "name": "projectNum01",
        "func": "msg.payload.projectId='projectNum01'\nreturn msg;",
        "outputs": 1,
        "timeout": 0,
        "noerr": 0,
        "initialize": "",
        "finalize": "",
        "libs": [],
        "x": 660,
        "y": 220,
        "wires": [
            [
                "23994dbc840a7ce6"
            ]
        ]
    },
    {
        "id": "411363cd9bd10a0c",
        "type": "comment",
        "z": "389108cf5e372918",
        "name": "A 설정 세팅(projectId)",
        "info": "",
        "x": 680,
        "y": 160,
        "wires": []
    },
    {
        "id": "8d56be140949ad6c",
        "type": "function",
        "z": "389108cf5e372918",
        "name": "projectNum02",
        "func": "msg.payload.projectId='projectNum02'\nreturn msg;",
        "outputs": 1,
        "timeout": 0,
        "noerr": 0,
        "initialize": "",
        "finalize": "",
        "libs": [],
        "x": 660,
        "y": 300,
        "wires": [
            [
                "bbf5e59569ef9c5e"
            ]
        ]
    },
    {
        "id": "23994dbc840a7ce6",
        "type": "function",
        "z": "389108cf5e372918",
        "name": "target(local)",
        "func": "msg.payload.targetUrl='localhost'\nmsg.payload.targetPort='8080'\nreturn msg;",
        "outputs": 1,
        "timeout": 0,
        "noerr": 0,
        "initialize": "",
        "finalize": "",
        "libs": [],
        "x": 970,
        "y": 220,
        "wires": [
            [
                "735dd47aa923edda"
            ]
        ]
    },
    {
        "id": "8db7557e970a9a9d",
        "type": "comment",
        "z": "389108cf5e372918",
        "name": "B 설정 세팅(target)",
        "info": "",
        "x": 950,
        "y": 160,
        "wires": []
    },
    {
        "id": "21a72f6b7be84d83",
        "type": "function",
        "z": "389108cf5e372918",
        "name": "target(serverA)",
        "func": "msg.payload.targetUrl='http:serverA.com'\nmsg.payload.targetPort='8081'\nreturn msg;",
        "outputs": 1,
        "timeout": 0,
        "noerr": 0,
        "initialize": "",
        "finalize": "",
        "libs": [],
        "x": 1180,
        "y": 280,
        "wires": [
            [
                "735dd47aa923edda"
            ]
        ]
    },
    {
        "id": "bbf5e59569ef9c5e",
        "type": "function",
        "z": "389108cf5e372918",
        "name": "target(ServerB)",
        "func": "msg.payload.targetUrl = 'http:serverB.com'\nmsg.payload.targetPort='8082'\nreturn msg;",
        "outputs": 1,
        "timeout": 0,
        "noerr": 0,
        "initialize": "",
        "finalize": "",
        "libs": [],
        "x": 980,
        "y": 340,
        "wires": [
            [
                "735dd47aa923edda"
            ]
        ]
    },
    {
        "id": "b584ee422c183395",
        "type": "comment",
        "z": "389108cf5e372918",
        "name": "C 설정 세팅 분기 (ment)",
        "info": "",
        "x": 240,
        "y": 440,
        "wires": []
    },
    {
        "id": "735dd47aa923edda",
        "type": "time-switch",
        "z": "389108cf5e372918",
        "name": "근무시간 여부",
        "lat": "37.564214",
        "lon": "127.001699",
        "startTime": "09:00",
        "endTime": "18:00",
        "startOffset": "0",
        "endOffset": 0,
        "x": 140,
        "y": 500,
        "wires": [
            [
                "2117890feccac6aa"
            ],
            [
                "4e28e016aecb2cd3"
            ]
        ],
        "outputLabels": [
            "근무시간",
            "근무 외 시간"
        ]
    },
    {
        "id": "2117890feccac6aa",
        "type": "function",
        "z": "389108cf5e372918",
        "name": "근무시간",
        "func": "msg.payload.ment=\"근무시간 입니다.\"\nreturn msg;",
        "outputs": 1,
        "timeout": 0,
        "noerr": 0,
        "initialize": "",
        "finalize": "",
        "libs": [],
        "x": 440,
        "y": 480,
        "wires": [
            [
                "6b3c1c70b041e627"
            ]
        ]
    },
    {
        "id": "4e28e016aecb2cd3",
        "type": "function",
        "z": "389108cf5e372918",
        "name": "근무외 시간",
        "func": "msg.payload.ment=\"근무외 시간입니다.\"\nreturn msg;",
        "outputs": 1,
        "timeout": 0,
        "noerr": 0,
        "initialize": "",
        "finalize": "",
        "libs": [],
        "x": 450,
        "y": 540,
        "wires": [
            [
                "6b3c1c70b041e627"
            ]
        ]
    },
    {
        "id": "6b3c1c70b041e627",
        "type": "http response",
        "z": "389108cf5e372918",
        "name": "",
        "statusCode": "200",
        "headers": {},
        "x": 720,
        "y": 500,
        "wires": []
    },
    {
        "id": "cf30e87595d4e294",
        "type": "comment",
        "z": "389108cf5e372918",
        "name": "C 설정 세팅(ment)",
        "info": "",
        "x": 450,
        "y": 440,
        "wires": []
    }
]

+ Recent posts