package com.portfolio.dto;
import io.swagger.v3.oas.annotations.media.Schema;
import lombok.Getter;
import lombok.Setter;
/*
* API 요청 결과를 담는 DTO
* date: 2024-07-26
* author: 김만기
====== Annotation description ======
Schema: swagger 문서 작성을 위한 annotation
*/
@Getter
@Setter
public class ApiResultDto<T> {
@Schema(description = "결과 코드", example = "200")
private String resultCode;
@Schema(description = "결과 메시지", example = "성공")
private String resultMessage;
@Schema(description = "추가 데이터")
private T data;
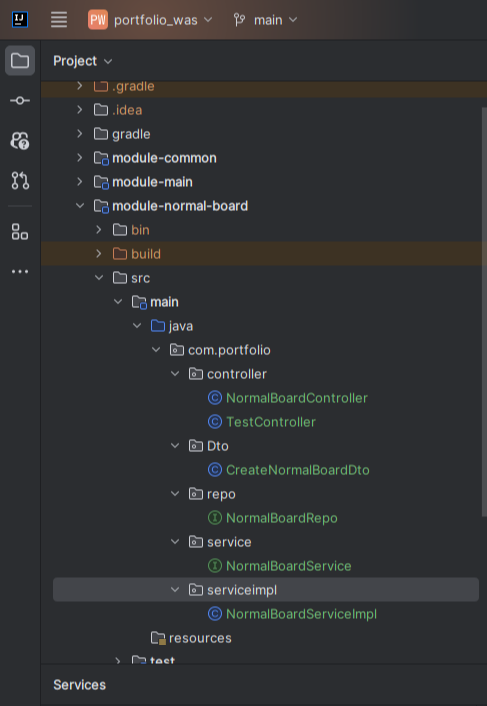
}normal-board의 프로젝트 구조
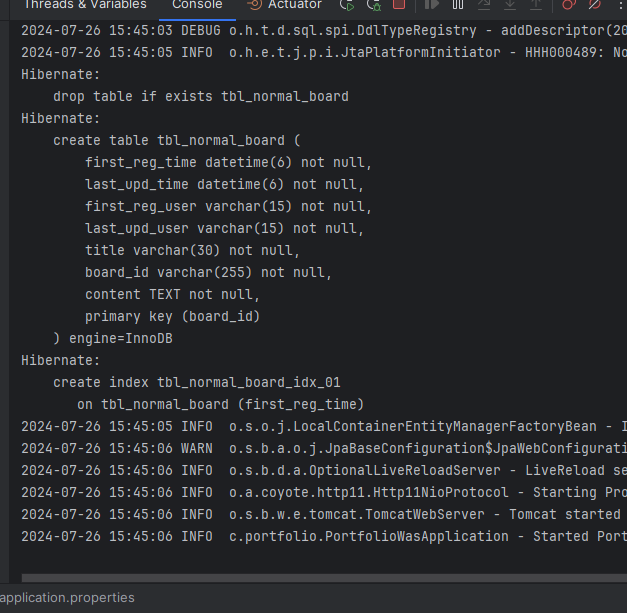
main 프로젝트의 application.porperites(JPA 및 DB 설정)
server.port = 8080


# JPA Configuration
spring.datasource.url=jdbc:mariadb://localhost:3306/portfolio
spring.datasource.username=adm
spring.datasource.password=123
spring.datasource.driver-class-name=org.mariadb.jdbc.Driver
spring.jpa.hibernate.ddl-auto=create

spring.jpa.properties.hibernate.show_sql=true
spring.jpa.properties.hibernate.format_sql=true
spring.jpa.properties.hibernate.use_sql_comments=true
logging.level.org.hibernate.type.descriptor.sql=trace
BaseEntity(테이블 공통) 및 NormalBoardEntity
BaseEntity
package com.portfolio.entity;

import jakarta.persistence.Column;
import jakarta.persistence.MappedSuperclass;
import lombok.AllArgsConstructor;
import lombok.Getter;
import lombok.NoArgsConstructor;
import lombok.Setter;
import lombok.experimental.SuperBuilder;

import java.time.LocalDateTime;

/*
    * date : 2024.07.26
    * author : 김만기
    * Base Entity: 모든 엔티티의 공통 필드를 정의한 추상 클래스

    * ====== Annotation description ======
    MappedSuperclass: jpa에서 상속 시 상속 받은 값들을 컬럼으로 사용하기 위함
    SuperBuilder: extends한 클레스에 builder를 사용하기 위함
    Column: 컬럼명, 길이, notNull 등의 설정

    * ====== field description ======
    firstRegTime: 최초 등록 시간
    lastUpdTime: 마지막 수정 시간
    firstRegUser: 최초 등록 사용자
    lastUpdUser: 마지막 수정 사용자
 */

@MappedSuperclass
@SuperBuilder
@NoArgsConstructor
@AllArgsConstructor
@Getter
@Setter
public abstract class BaseEntity {
    @Column(nullable = false)
    LocalDateTime firstRegTime;
    @Column(nullable = false)
    LocalDateTime lastUpdTime;
    @Column(length = 15, nullable = false)
    String firstRegUser;
    @Column(length = 15, nullable = false)
    String lastUpdUser;
}
NormalBoardEntity
package com.portfolio.entity;

import jakarta.persistence.*;
import lombok.AllArgsConstructor;
import lombok.Getter;
import lombok.NoArgsConstructor;
import lombok.Setter;
import lombok.experimental.SuperBuilder;


/**
 * 일반 게시판 Entity
 * date : 2024.07.26
 * author : 김만기
 ====== Annotation description ======
 Entity: JPA Entity로 선언
 SuperBuilder: 상속 받는 값을을 builder로 사용하기위해 필요
 Table: 테이블 명을 클래스명과 별도로 세팅, index 설정
 Id: pk로 사용할 변수 선언
 GeneratedValue: pk값 자동생성 전략을 선택
 Column: 컬럼명, 길이, notNull 등의 설정
 ====== field description ======
 boardId: 게시판 아이디
 title: 게시판 제목
 content: 게시판 내용
 */

@Entity
@Getter
@Setter
@SuperBuilder
@Table(name = "tbl_normal_board", indexes =
        @Index(name = "tbl_normal_board_idx_01", columnList = "first_reg_time")
)
@NoArgsConstructor
@AllArgsConstructor

public class NormalBoard extends BaseEntity {

    @Id
    @GeneratedValue(strategy = GenerationType.UUID)
    private String boardId;

    @Column(length = 30, nullable = false)
    private String title;

    @Column(columnDefinition = "TEXT", nullable = false)
    private String content;
}
실행후 JPA로 Table 생성 확인
NormalBoardRepo
package com.portfolio.repo;

import com.portfolio.entity.NormalBoard;
import org.springframework.data.jpa.repository.JpaRepository;

/*
    * date: 2024-07-26
    * author: 김만기
    * JpaRepository를 상속받아 NormalBoard 엔티티를 관리하는 레포지토리
 */
public interface NormalBoardRepo extends JpaRepository<NormalBoard, String> {
}
CreateNormalBoardDto
package com.portfolio.Dto;

import com.portfolio.entity.NormalBoard;
import io.swagger.v3.oas.annotations.media.Schema;
import lombok.Getter;
import lombok.Setter;


/**
 * 일반 게시판 DTO
 date : 2024.07.26
 author : 김만기

 ====== Annotation description ======
 Schema: swagger 문서 작성을 위한 annotation

 ====== field description ======
 title: 게시판 제목
 content: 게시판 내용

 ====== method description ======
 toEntity: DTO를 DB에 적재하기 위한 Entity로 변환

 ====== etc description ======
 entity를 사용하고 싶었으나 entity를 사용하면 Swagger의 example Value가 모든 필드를 표기하는 문제가 있어서 DTO를 사용

 */
@Getter
@Setter
public class CreateNormalBoardDto {
    @Schema(description = "게시판 제목", example = "게시판 제목")
    private String title;

    @Schema(description = "게시판 내용", example = "게시판 내용")
    private String content;

    public NormalBoard toEntity() {
        return NormalBoard.builder()
                .title(title)
                .content(content)
                .build();
    }
}
NormalBoardService
package com.portfolio.service;

import com.portfolio.entity.NormalBoard;

import java.util.List;
/*
    * 일반 게시판 서비스 인터페이스
    * date: 2024-07-26
    * author: 김만기
    ====== method description ======
    * insertNormalBoard: 일반 게시판 등록
 */
public interface NormalBoardService {
    public void insertNormalBoard(NormalBoard board);

    public List<NormalBoard> selectAllBoardList();
}
NormalBoardServiceImpl
package com.portfolio.serviceimpl;

import com.portfolio.entity.NormalBoard;
import com.portfolio.repo.NormalBoardRepo;
import com.portfolio.service.NormalBoardService;
import lombok.RequiredArgsConstructor;
import lombok.extern.slf4j.Slf4j;
import org.springframework.stereotype.Service;

import java.util.List;
/*
    * 일반 게시판 서비스 구현체
    * date: 2024-07-26
    * author: 김만기
    *
    * ====== Annotation description ======
    * Service: 서비스 빈으로 등록
    *
    * ====== method description ======
    * insertNormalBoard: 일반 게시판 등록
 */
@Service
@RequiredArgsConstructor
@Slf4j
public class NormalBoardServiceImpl implements NormalBoardService {
    private final NormalBoardRepo boardRepo;

    @Override
    public void insertNormalBoard(NormalBoard board) {
        try {
            boardRepo.save(board);
        } catch (Exception e) {
            e.printStackTrace();
        }

    }

    @Override
    public List<NormalBoard> selectAllBoardList() {
        return boardRepo.findAll();
    }
}
ApiResultDto
NormalBoardController
package com.portfolio.controller;

import com.portfolio.Dto.CreateNormalBoardDto;
import com.portfolio.dto.ApiResultDto;
import com.portfolio.entity.NormalBoard;
import com.portfolio.service.NormalBoardService;
import io.swagger.v3.oas.annotations.Operation;
import io.swagger.v3.oas.annotations.tags.Tag;
import lombok.RequiredArgsConstructor;
import org.springframework.http.ResponseEntity;
import org.springframework.web.bind.annotation.PostMapping;
import org.springframework.web.bind.annotation.RequestBody;
import org.springframework.web.bind.annotation.RequestMapping;
import org.springframework.web.bind.annotation.RestController;

import java.time.LocalDateTime;

/*
  * 일반 게시판 컨트롤러
  * date: 2024-07-26
  * author: 김만기

  *  ====== Annotation description ======
  * Tag: swagger 문서 작성을 위한 annotation(NormalBoardController를 한 그룹으로 세팅)
  * Operation: swagger 문서 작성을 위한 annotation(메소드별 설명 작성)
 */
@RestController
@RequestMapping("/api/normal-board")
@RequiredArgsConstructor
@Tag(name = "NormalBoard", description = "일반 게시판 관련 API")
public class NormalBoardController {

    private final NormalBoardService normalBoardService;

    @PostMapping("/insert")
    @Operation(summary = "게시물 등록")
    public ResponseEntity<ApiResultDto<NormalBoard>> insertNormalBoard(
            @RequestBody CreateNormalBoardDto board
    ) {
        ApiResultDto<NormalBoard> result = new ApiResultDto<>();
        try {
            NormalBoard normalBoard = board.toEntity();

            normalBoard.setFirstRegTime(LocalDateTime.now());
            normalBoard.setLastUpdTime(LocalDateTime.now());

            // 로그인 기능이 없기 때문이 임시세팅
            normalBoard.setFirstRegUser("admin");
            normalBoard.setLastUpdUser("admin");

            normalBoardService.insertNormalBoard(normalBoard);
            result.setData(normalBoard);
            result.setResultCode("200");
            result.setResultMessage("Success");
        } catch (Exception e) {
            result.setResultCode("500");
            result.setResultMessage("Fail");
        }

        return new ResponseEntity<>(result, result.getResultCode().equals("200") ? org.springframework.http.HttpStatus.OK
                : org.springframework.http.HttpStatus.INTERNAL_SERVER_ERROR);
    }
}
TEST
Example Value default 값 확인

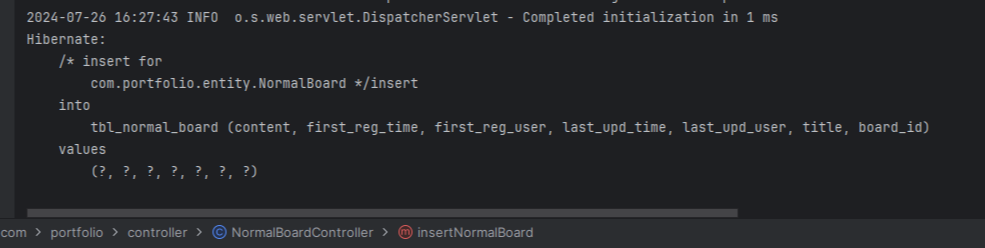
Insert 쿼리 확인
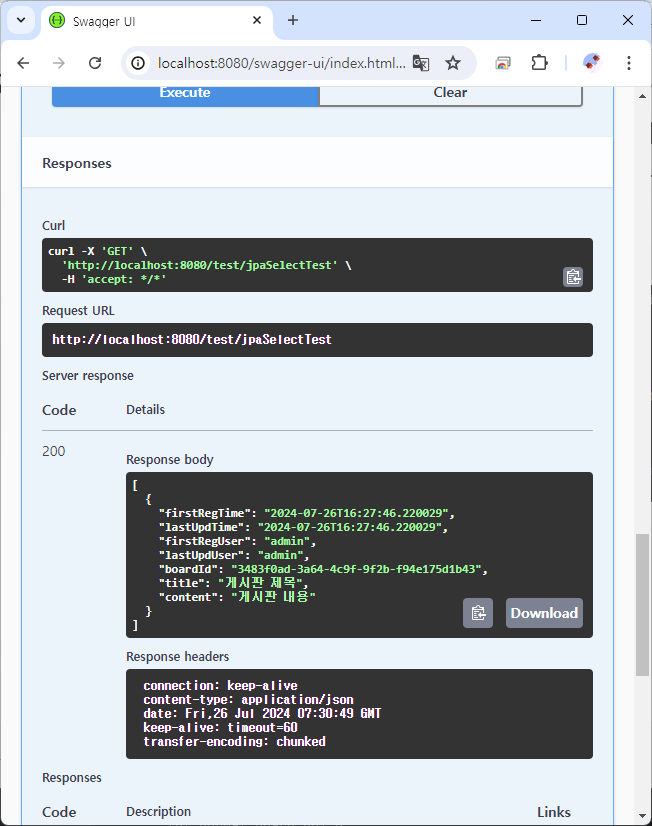
임시 Select 쿼리를 사용한 조회
https://github.com/Kmmanki/portfolio_was
GitHub - Kmmanki/portfolio_was: portfolio
portfolio. Contribute to Kmmanki/portfolio_was development by creating an account on GitHub.
github.com
'웹 정리 > 웹 포트폴리오 만들기' 카테고리의 다른 글
| WAS 7차 boot jar 만들어보기 (0) | 2024.09.03 |
|---|---|
| WAS 6차 (게시물 생성 ValidationCheck) (0) | 2024.09.03 |
| WAS 4차 (ELK, Logback, Jenkins를 사용한 배치 컨트롤 및 로그수집)_긴급 (0) | 2024.06.13 |
| WAS 3차 (docker maria DB 세팅) (0) | 2024.06.01 |
| WAS 2차 (멀티모듈 프로젝트 세팅) (0) | 2024.05.28 |